
How to Make Tumblers at Home & Step-by-Step Make DIY Tumblers

Table of Contents
An interesting and inventive approach to creating an articulation together with your drinkware is to build personalize DIY tumblers. Learning how to make DIY tumblers gives you a world of openings, whether you must deliver one-of-a-kind presents for companions and family or imbue your collection with a small of your singularity.
To assist you in realizing your custom tumbler thoughts and changing a normal tumbler into a work of craftsmanship, we’ll go through how to make tumblers in this article. Let’s investigate the captivating domain of making bespoke tumblers!
Our creative voyage commences with a collaboration with Sandjest, a brand that embodies the essence of personalized gifts. Sandjest envisions gift-giving as a vehicle for conveying profound emotions, providing an array of handcrafted, uniquely personalized gifts that resonate with sentiments and memories.
Prepare yourself for an enchanting expedition into the art of how to make DIY tumblers, and watch your artistic spirit take flight. It’s time to infuse a dash of personal enchantment into every sip, all thanks to Sandjest’s unwavering commitment to heartfelt gift-giving.
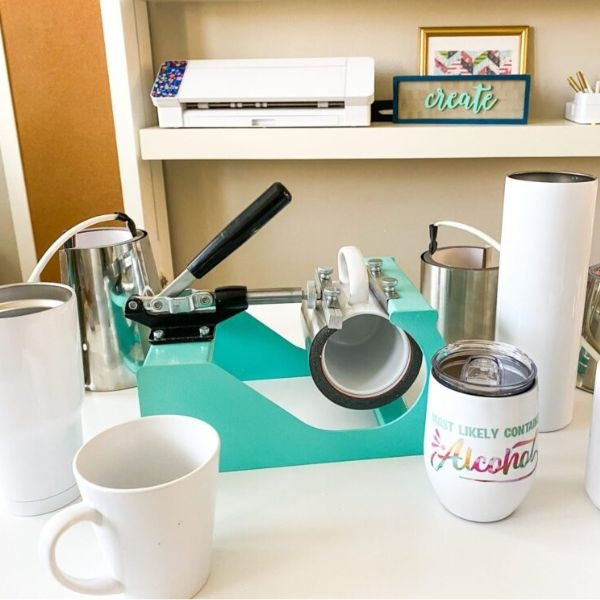
Choosing Your Tumbler to Customize
Before going in-depth into step by step on how to make tumblers, try to choose your tumbler to customize at first. Indeed, redoing a tumbler can be a fun and inventive way to precise your identity or advance your brand. When selecting a tumbler to customize, a few critical components must be considered to guarantee the ultimate item meets your desires. In this direct, we’ll investigate three key viewpoints: Fabric Contemplations, Measure and Shape, and Realistic Components.
Material Considerations
When you embark on the journey to Make DIY Tumblers, begin by carefully choosing your tumbler base. Options abound, ranging from stainless steel and plastic to glass and ceramic. Each material possesses unique characteristics, and your choice should align with your intended design and purpose.
For instance, stainless steel provides durability, while glass offers transparency for intricate designs. Furthermore, think about the adhesives and sealants you plan to use; epoxy resin, a popular choice, can render a glossy, protective finish.
Additionally, glass tumbler cup designs are stylish and excellent for showcasing intricate or colorful patterns. They should be handled carefully to prevent breakage because they are generally used for cold beverages. Drinks stay hot longer in ceramic mugs, which also look lovely. Being softer, they are more likely to break if dropped.
Size and Shape
To begin with, choose a tumbler estimate depending on how much fluid you ordinarily drink. The customary sizes shift between 12 to 30 ounces. Greater ones are great for drinks with water or ice, whereas smaller ones are great for coffee or cocktails.
In addition, tumblers can be found in different shapes, such as straight, funnel-shaped, and bent tumblers. How the tumbler looks and feels can influence how simple it is to use and how much people like it. Choose the choice that merely likes and fits your needs the foremost.
Graphic Elements
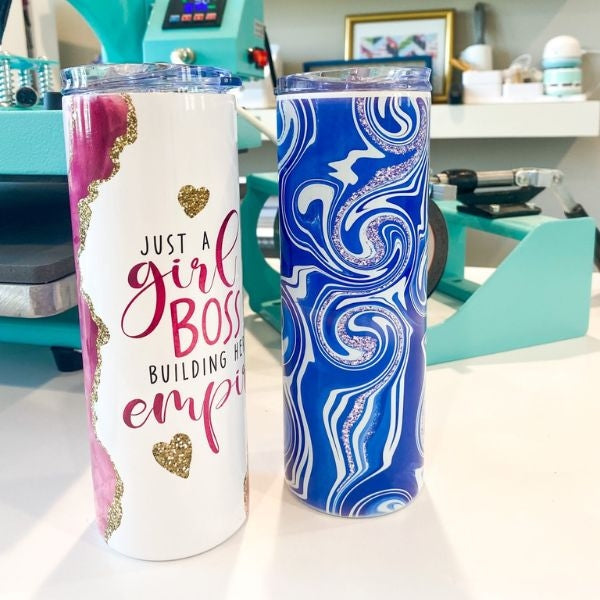
Consider the style you need to show sometime recently personalizing your tumbler. It could be your title, a brand, a beloved trademark, or a dazzling plan that you just discovered engaging. Check that the plan shows up how you need it to or precisely speaks to your brand.
Besides, your tumbler’s colors and how they will suit your plan. Shining and solid tones will draw consideration to your tumbler, while milder and more quieted colors will grant it a classic and continuously a la mode fashion.
Depending on the fabric of your tumbler cup designs, there are a few ways to brighten it. You will select between screen printing, advanced printing, and etching. Each choice has stars and downsides, so select the most excellent one for your plan and materials.
Choose where you need your plan to go on the tumbler. A few prevalent conceivable outcomes incorporate having the design cover the whole glass, having it on as if it were one side, or making it coordinate a certain shape or area on the cup’s surface.
How to Make Custom Tumblers: Customisation Techniques
Now, let’s dive into the techniques of how to make custom tumblers by painting, applying glitter and using epoxy to get your ideal product.
Painting Tumblers
- To realize the full scope of your tumbler cup designs with sparkle without utilizing an intemperate sum, it’s prudent to begin by applying a coat of splash paint.
- Select a shower paint color that closely matches the sparkle you proposed to utilize. This starting shower paint layer will empower you to get less sparkle, and any ranges where the sparkle doesn’t follow well won’t be exceptionally recognisable due to the basic shower paint.
- Sometime recently, you started portraying the tumbler, utilizing painter’s tape to encompass the glass’s best and foot edges. When taping the best edge, position the tape to cover half of the lip and then crease it onto the interior to ensure that zone.
- To avoid paint entering the container amid the paint, stuff the glass with paper towels.
- When the shower portrays the tumbler, applying the paint softly to dodge trickles and uneven coverage is basic. Even if you incidentally make a trickle, do not stress because it can be concealed afterwards with a coat of sparkle and two coats of epoxy.
- If you want to play down the hazard of trickles when showering, portray the tumbler; you’ll put it on an expansion post device and manually rotate the conclusion of the pole/turner while splashing together with your other hand.
- Permit the splash paint to completely dry sometime recently. Don’t expel the tape at this arrangement, as you’ll find why it’s a terrible thought within the other step.
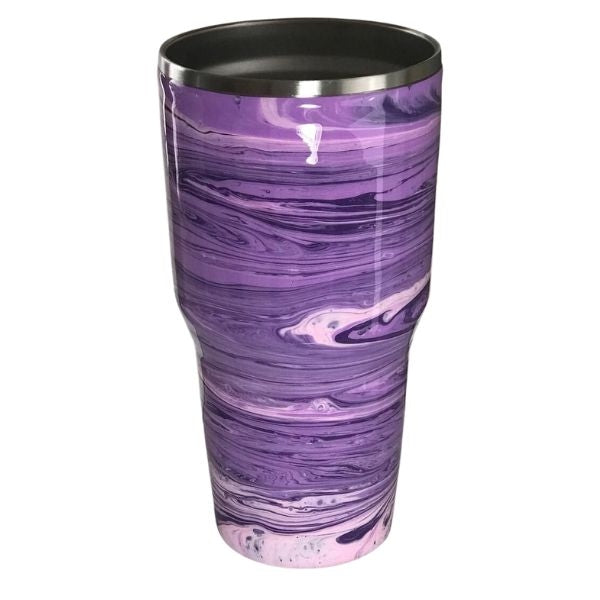
Applying Glitter
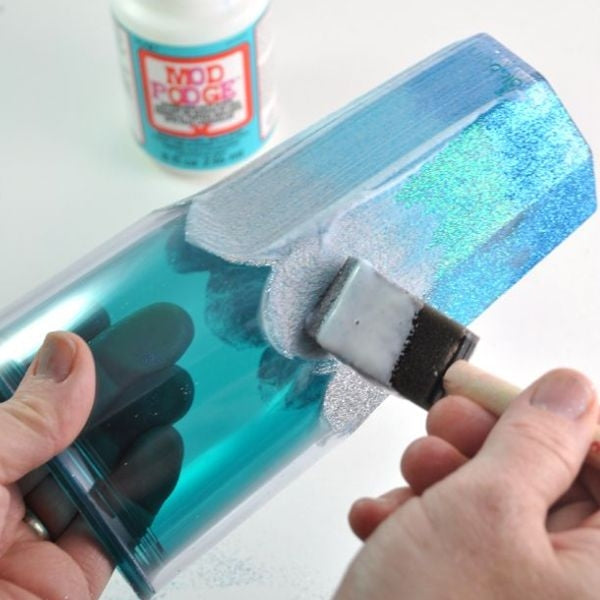
- There are different strategies to consolidate sparkle onto a personalized glitter tumbler, and I chose to use the Mod Podge procedure. On the other hand, you’ll be able to want a lean epoxy layer, which would likely result in a more uniform sparkle application.
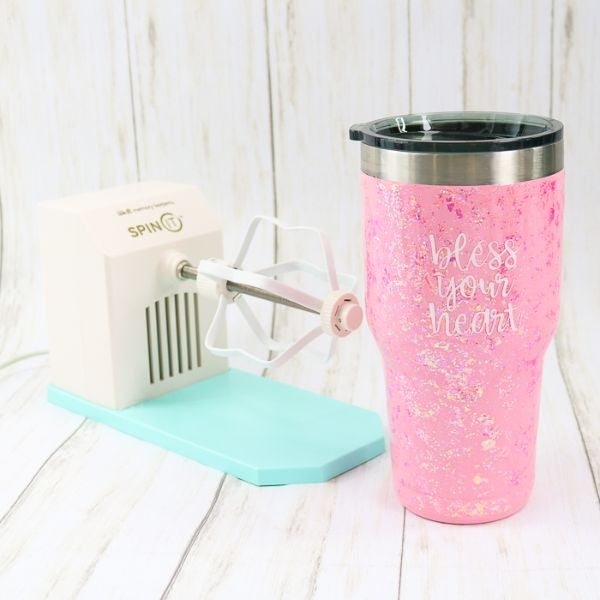
- Even with your choice, the most effortless way to apply the sparkle is when the tumbler is set on a turning base (spinner). It’s pivotal to have tape ensuring the best foot of the tumbler to keep it in a level position while applying the sparkle. We didn’t have the spinner in movement for the Mod Podge strategy, but we physically pivoted the glitter tumbler as we worked.
- To contain the sparkle, crease a bit of printer paper in half and position it underneath the spinner. The collapsed wrinkle makes it helpful to return any overabundance of glitter to the holder.
- You wish to work quickly to guarantee the Mod Podge doesn’t dry as well. Utilize a silicone brush to apply a thick coat of Mod Podge over the complete tumbler’s surface. Sprinkle the glitter in areas, guaranteeing total scope as you physically pivot the tumbler. Point for an indeed layer of sparkle. High-quality, coloured-through sparkle works best for tumblers because it holds its sparkle after sanding in afterwards steps.
- On the off chance that your sparkle tumbler doesn’t see culminating at first, do not stress. You’ll include more Mod Podge and sparkle-in-a-moment applications.
- Following, seal the sparkle layer utilizing Krylon Clear Coat Shower. Applying two coats can offer assistance indeed out of any uneven regions of sparkle. This step guarantees that you won’t spread sparkle once you include epoxy within the taking-after step.
- Hold up a few hours for the glitter tumbler to dry altogether, sometimes recently continuing with the epoxy application.
Using Epoxy
If you’re interested in the sort of epoxy to utilize for beautifying tumblers, a common address among apprentices, I suggest using Astounding Clear Cast epoxy. This epoxy comes with two parts that you just have to blend. You’ll discover it as part of a total epoxy tumbler pack.
- Guarantee that you simply wear gloves and work in a well-ventilated zone. Degree out 5 ml of Portion A into one measuring glass and 5 ml of Portion B into another.
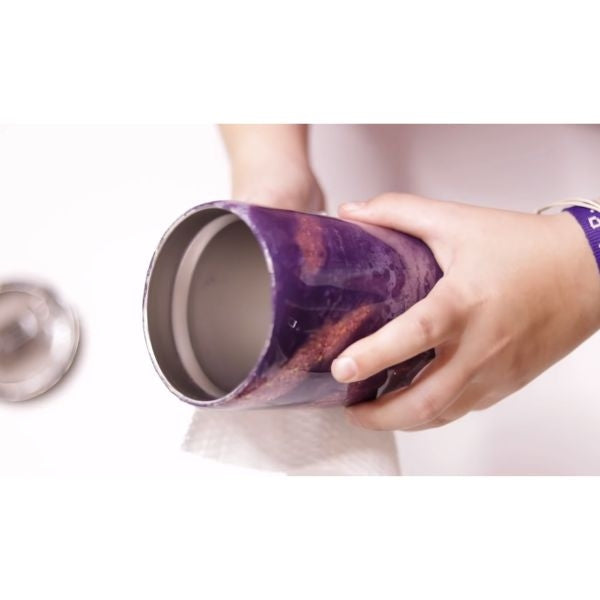
- Begin by pouring the thicker Portion A into a purge blending glass. Utilize a popsicle adhere to rub the sides to exchange as much as conceivable. Another, pour the more slender Part B into the thicker Portion A.
- Blend the two parts with the popsicle adhere, mixing gradually to anticipate bubbles. Proceed blending until the epoxy gets to be clear, not cloudy.
- Turn on your glass spinner, set it to a slow speed, and start pouring the epoxy onto the container.
- Proceed pouring and spreading the epoxy on the pivoting glass until the complete surface is secured. Keep the container turning.
- After applying all the epoxy, hold it up for approximately 5-10 minutes, and after that, carefully (while still wearing gloves) evacuate the tape from both the best and foot of the epoxy tumblers. Clearing out the tape will fix it beneath the epoxy layer.
- Permit the tumbler turner to turn the container gradually for 6-8 hours to guarantee legitimate curing.
Preserving Your Customization
After diving into how to make tumblers, let’s go into preserving your customisation with sealing techniques, care and maintenance.
Sealing Techniques
Step 1: Appropriately Plan the Cement Vinyl
Start by applying the cement vinyl to your glitter tumblers using the pivot strategy. Smooth out the plan employing a scratching instrument, guaranteeing it’s appropriately in some time recently expelling the paper backing.
After this, permit the cement vinyl to remedy or dry for a few hours or days. Allude to the bundle enlightening for particular suggestions on guaranteeing great attachment. Maintain a strategic distance from utilizing or washing the tumbler amid this curing handle, and move on to the fixing step.
Step 2: Clean the epoxy tumbler
Sometime recently, applying the sealant, utilizing rubbing liquor and a clean cloth to expel any remaining undesirable cement buildup from the epoxy cups. This step is vital to guarantee that the sealant follows legitimately. Ensure the cloth is moist but not splashed with the dissolvable, and permit it to dry for many minutes.
Step 3: Apply Sealant to Your Vinyl Decal
To avoid sealant from entering the mouthpiece, apply painter’s tape around the beat of the epoxy tumblers. Working with fluid sealant, pour a satisfactory sum for the introductory coat into an isolated holder.
This makes a difference in ensuring the remaining sealant is clean and contaminants, whereas you work on your current extent. Apply the sealant to the vinyl and tumbler employing a brush.
In the case of a splash sealant, apply a lean layer first instead of a thick one. Permit the primary coat to dry sometime recently, applying the following. If you lean toward a thicker sealant layer, permit each coat to dry for hours.
Step 4: Permit the Sealant to Cure
Curing is fundamental to guarantee long-lasting security for your cement vinyl tumbler. The curing duration varies depending on the sort of sealant you’re utilizing.
For the case with Mod Podge, you may be held up for 28 days sometime recently utilizing your tumbler. Carefully take after the enlightening given along with your chosen sealant, as each one has its claim suggested curing period.
That concludes the sealing preparation, and your epoxy cups are prepared for utilization. Even though it may be a time-consuming preparation, the results are well worth it.
With legitimate sealing, both the vinyl on your tumbler and the tumbler itself can stay in fabulous condition for a long time, and a few may indeed last a decade or more before the sealant starts to break down.
Care and Maintenance
Besides understanding how to make tumblers, care and maintenance might also be important to consider.
Keeping up custom tumbler glasses is basic to guarantee their life span and cleanliness. Whether you have personalized tumblers for yourself or you’re dependable for keeping them up in a commerce or occasion setting, taking these steps will offer assistance in keeping them in incredible condition:
Hand Washing
- Lean toward Hand Washing: Custom glitter tumblers with perplexing plans or decals are best cleaned by hand to anticipate harm.
- Utilize Mellow Cleanser: Utilize a mellow dishwashing cleanser or cleanser. Maintain a strategic distance from grating or unforgiving chemicals that can harm the tumbler’s surface or plan.
Cleaning Handle
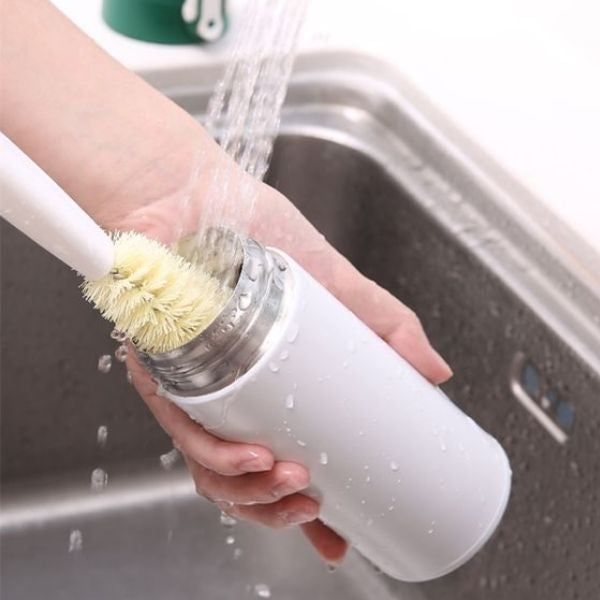
- Evacuate Top and Straw: Separated all detachable parts, counting the top and straw, if appropriate.
- Wash To begin with: Flush the epoxy cups altogether with warm water to expel any buildup.
- Clean Tenderly: Utilize a soft-bristle bottle brush or wipe to clean the interior of the tumbler delicately. Guarantee you reach all corners and holes.
Cleaning the Cover and Straw
- Cover and Gasket: Consider the lid’s gasket and any silicone or elastic parts. Clean these all together to avoid form or microscopic organisms’ growth.
- Straw: If your tumbler contains a reusable straw, utilize a specialized straw brush to clean it viably.
Managing Stains and Odors
- Heating Pop Arrangement: For adamant stains or odors, make a glue with heating pop and water and clean the influenced regions. Flush altogether a while later.
- Vinegar Arrangement: On the other hand, you’ll be able to douse the tumbler in an arrangement of break-even with parts water and white vinegar for several hours, recently flushing. This makes a difference with odor evacuation.
Conclusion
In conclusion, we learned how to make tumblers. Making custom tumblers may be an imaginative and pleasant DIY extension that permits you to precise your fashion and plan preferences.
Whether making them for individual utilization or as one-of-a-kind blessings, the key steps include selecting the correct materials, arranging your plan, and applying it carefully to the tumbler surface. With a small phone and imagination, you can make dazzling custom tumblers that are both practical and outwardly engaging.
To enhance your personal gift-giving journey, why not delve into the enchanting world of Sandjest? Guided by a resolute commitment to crafting exquisitely personalized gifts, Sandjest ensures that the act of giving transcends mere tradition and evolves into an enduring, profoundly meaningful experience.
Therefore, as you set forth on your self-initiated adventure of crafting tumblers, hold close the very essence of personalized gifting, as embodied by Sandjest. Elevate your gift-giving exploits and forge indelible moments through the presentation of one-of-a-kind, handcrafted treasures. Permit love and individuality to flow freely, allowing these exceptional moments to flourish, all with the guidance and support of Sandjest.